Installing Address Validation for WooCommerce
Add address validation to your WooCommerce store to improve checkout completion rates and ensure accurate shipping information. This guide walks you through signing up for a free trial, installing the plugin, configuring it, and exploring advanced settings.
Overview
Use Address Lookup to enhance your WooCommerce checkout experience. For more details on capabilities and setup, see our Address Lookup guide.
Screenshots
Address Lookup
Step 1: Sign Up for a Free Trial
To use AddressZen, you'll first need to create an account and get your API key.
- If you don't have an account sign up to create a free account.
- Navigate to the KEYS section in your account.
- Copy your API Key - you'll need this to complete the setup in WooCommerce. It's a string of characters that begins with the letters
ak_. On signing up, your first key will have a balance of 200 free lookups for testing.
Step 2: Install the WooCommerce Plugin
You have two ways to install the AddressZen plugin for WooCommerce: directly through WordPress or manually.
Method A: Install via WordPress
This is the simplest method to integrate address validation into your WordPress site.
- Log in to your WordPress Admin Dashboard.
- Go to Plugins > Add New.
- Search for "AddressZen" and click Install Now.
- After installation, click Activate.
Method B: Install Manually
- Download the AddressZen WooCommerce plugin from GitHub (should be a .zip file) or download the latest version straight from the WordPress Marketplace.
- Unzip the release you downloaded.
- Log in to your WordPress Admin Dashboard.
- Go to Plugins > Add New > Upload Plugin.
- Click Choose File and select "AddressZen" from the file you downloaded.
- Click Install Now, then Activate.
Developer Note: If you're familiar with FTP, you can also upload the unzipped plugin folder directly to your
/wp-content/plugins/directory. This method is useful for servers with file upload limitations or when you need to modify plugin files before activation.
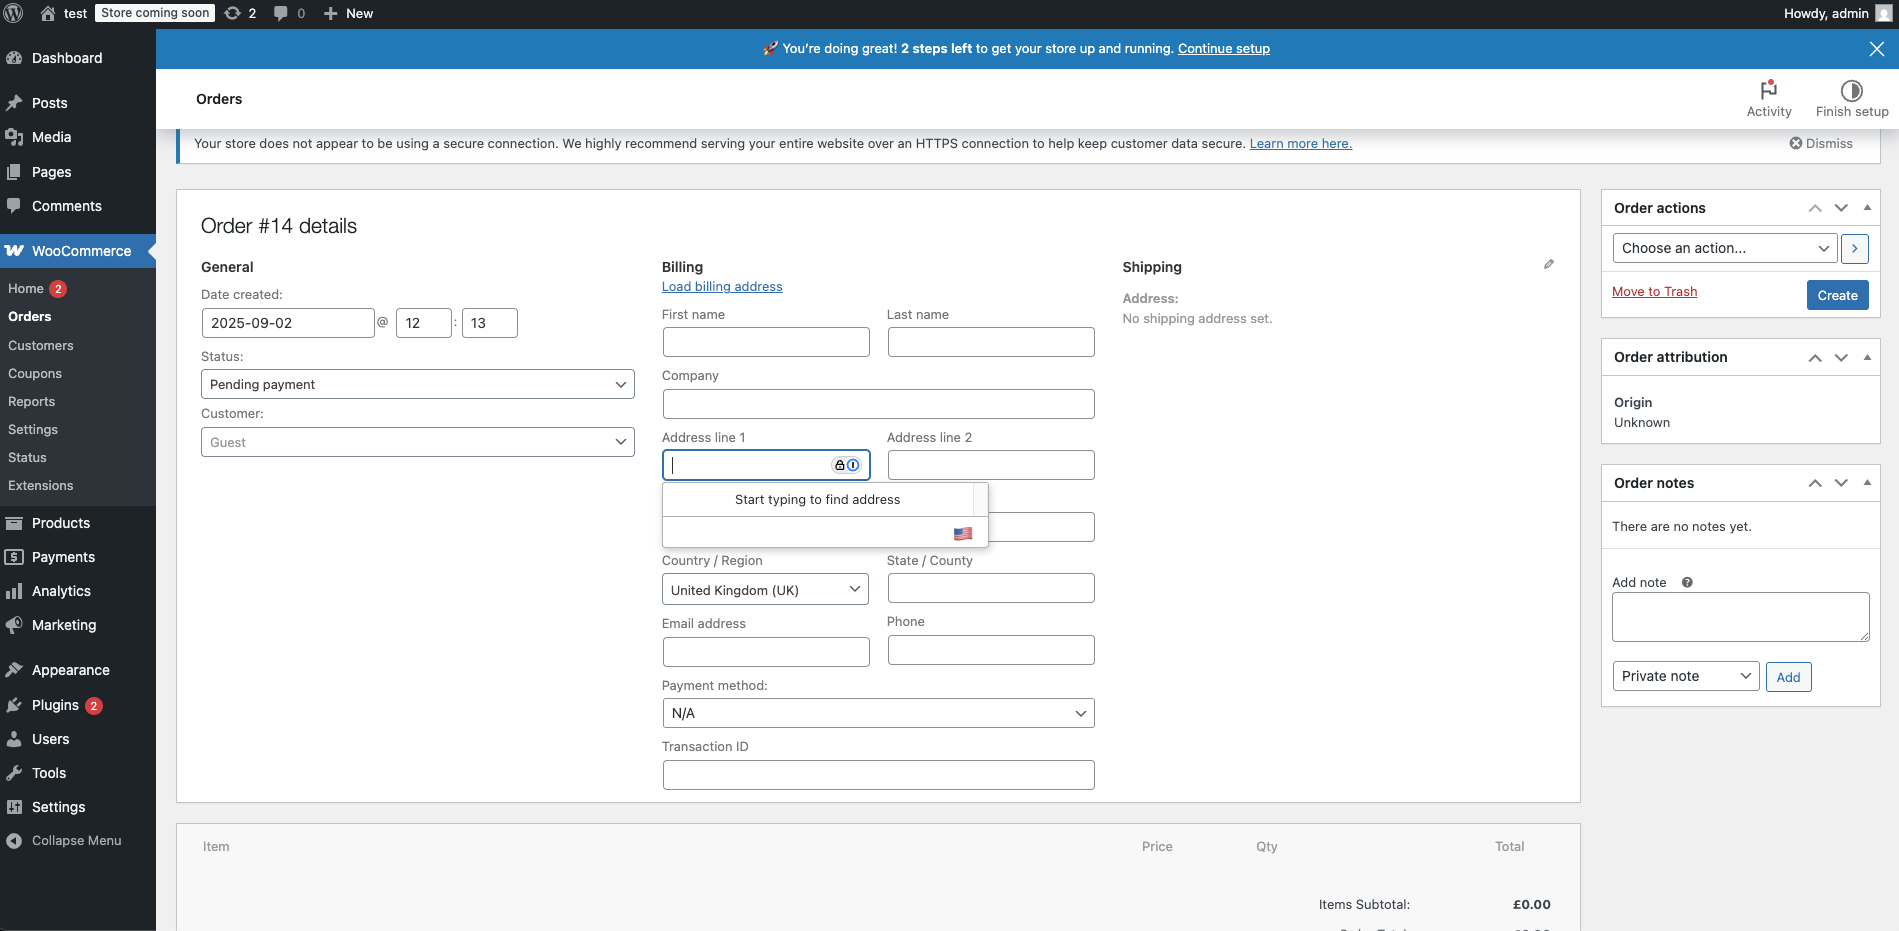
Step 3: Configure the Plugin
Once the plugin is installed, it's time to configure it.
- In your WordPress Admin, go to WooCommerce > Settings.
- Click on the Integration tab, and then select "AddressZen".
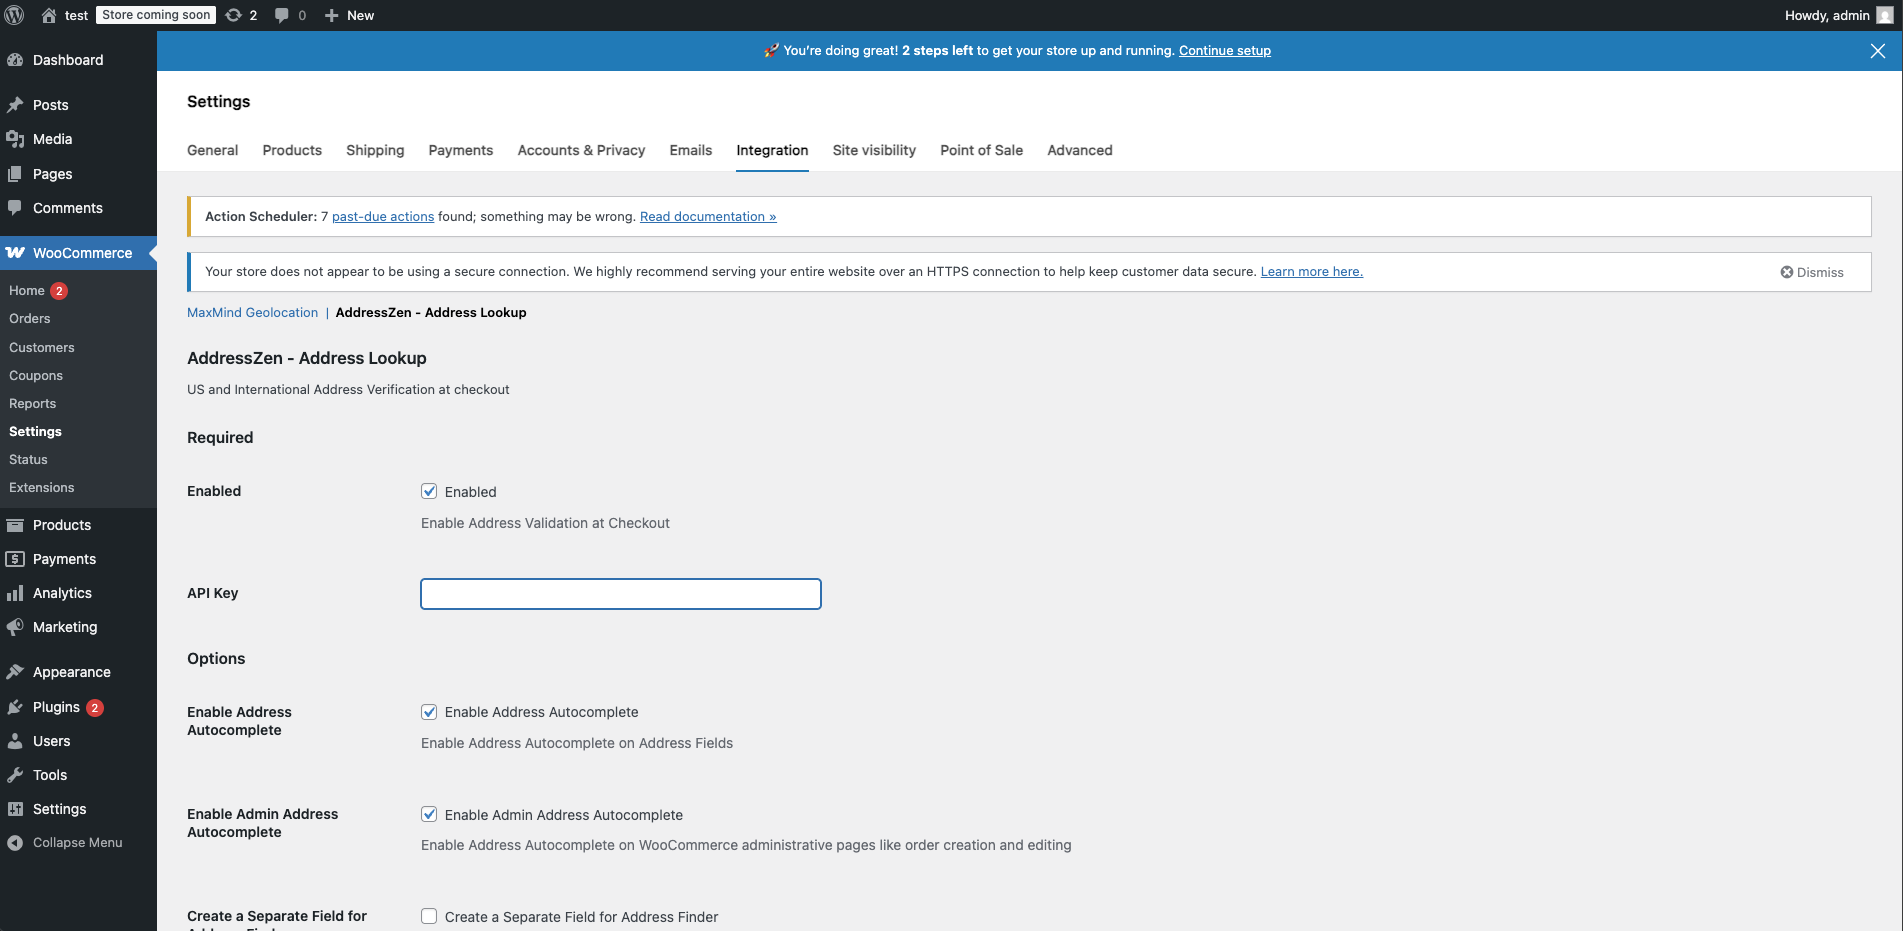
- Make sure the plugin is activated. The box Enabled should be ticked.
- Enter your API Key (the one you copied when signing up) in the designated field. You can always find the API Key under KEYS in your AddressZen account.
Give the key a specific name, so it's clear what it's used for in case you need to create more keys, e.g. shipping address.
For enhanced security and usage control, you can configure additional settings in your AddressZen account:
- Daily lookup limits: Prevent excessive usage
- URL restrictions: Limit where your key can be used
- IP whitelisting: Restrict usage to specific IP addresses
Learn more in our API Key Settings documentation.
- Enable Address Lookup by ticking the checkbox. If you are unsure about the best setup, read our Address Lookup guide.
- Click Save Changes.
Advanced Configuration Options
Optional Settings
The following settings are optional and can be adjusted to suit your specific requirements.
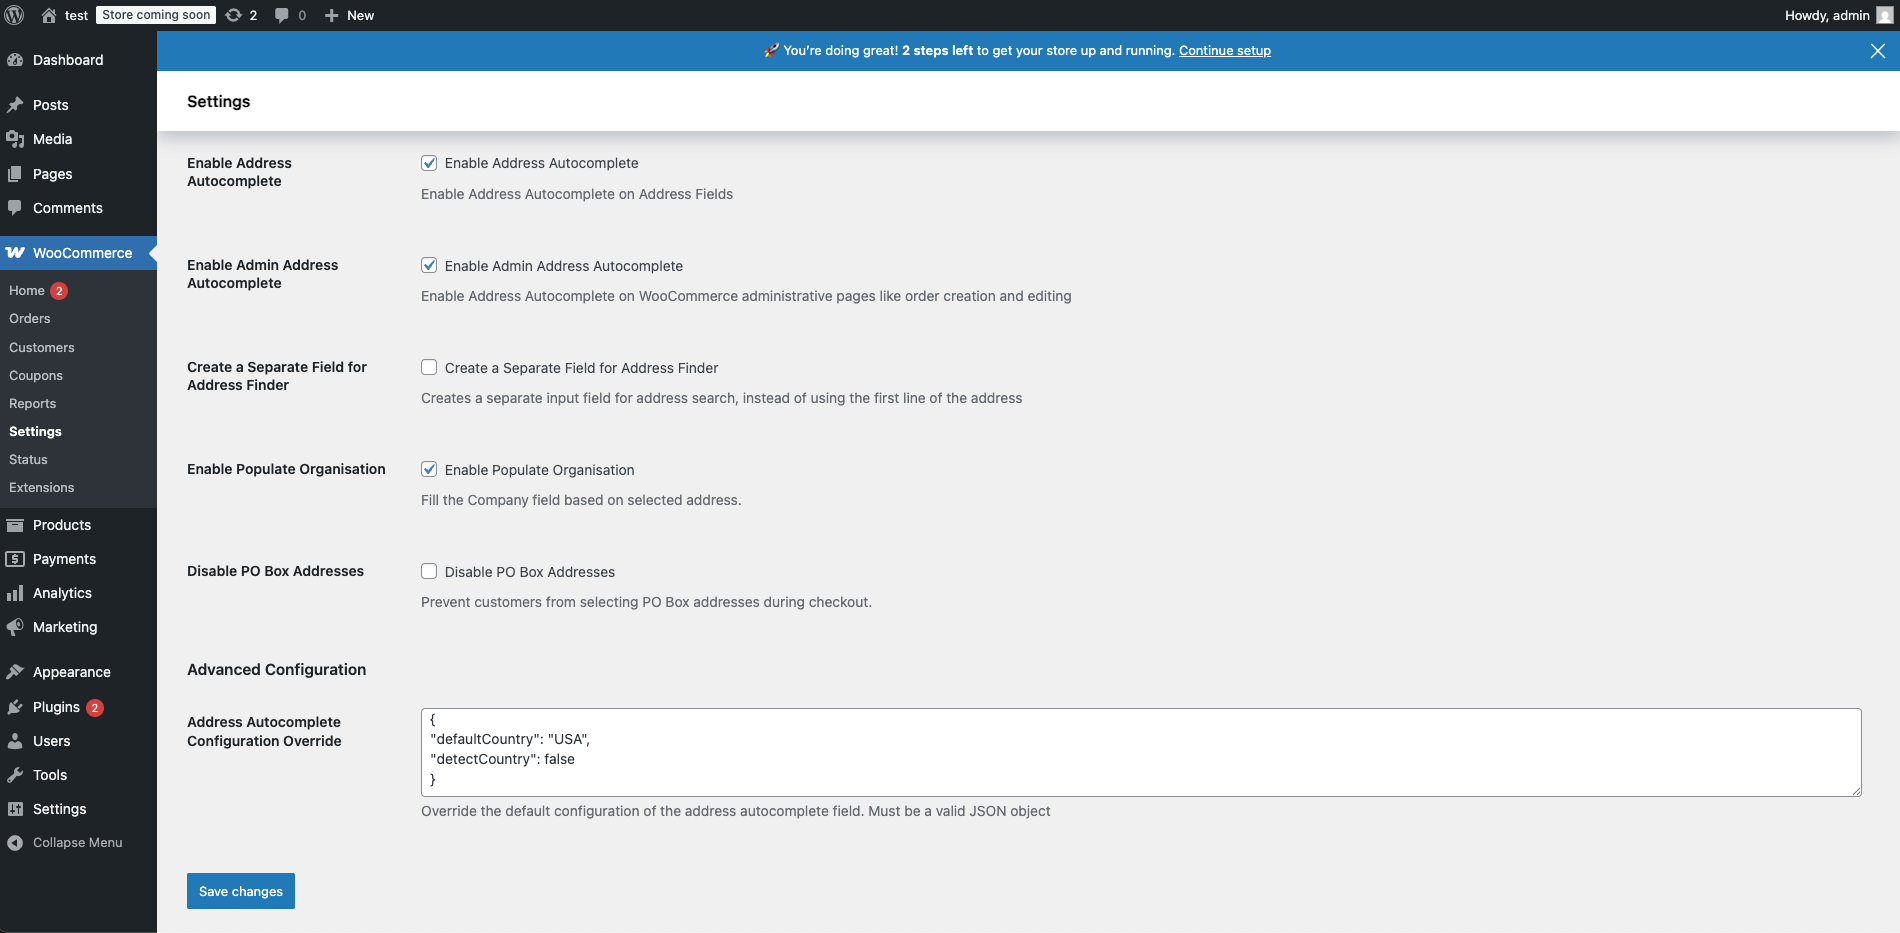
Make any necessary changes, and don't forget to Save.
For developers who need additional control over the plugin's behavior, advanced JSON configuration options are available.
| Setting | Description | Format | Documentation |
|---|---|---|---|
| Address Autocomplete Configuration Override | JSON configuration to override Address Lookup defaults | Valid JSON object | Address Lookup docs |
Example Configuration Override
{
	"defaultCountry": "USA",
	"detectCountry": false,
	"hideToolbar": true
}
Warning: Be careful when modifying these settings, as invalid JSON will prevent address validation from functioning correctly. Always validate your JSON using a JSON validator before saving.
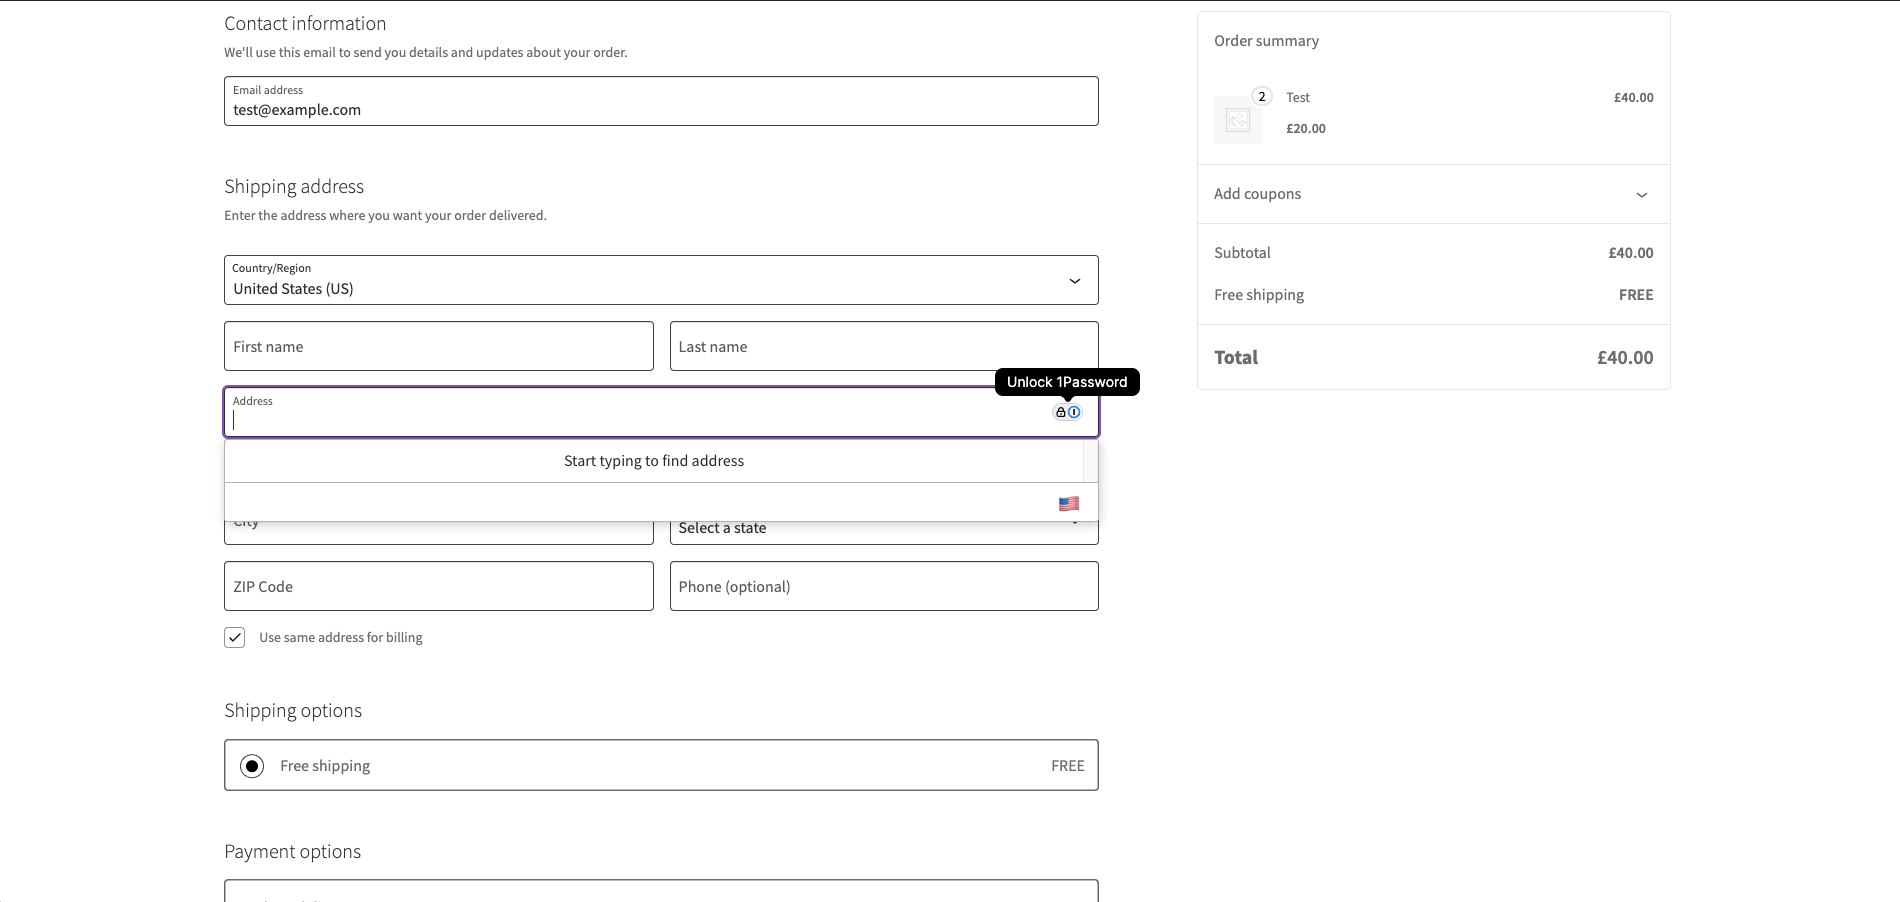
Step 4: Test the Integration
To make sure the address verification works:
- Go to your WooCommerce checkout page.
- Begin typing an address in the address field.
- The AddressZen address lookup tool should automatically suggest addresses as you type.
Elementor Integration
If you're using Elementor to design your WooCommerce checkout pages, you can still enable address verification with a few simple steps. This is necessary as Elementor disables the default page actions, which can prevent checkout plugins from functioning correctly. To resolve this issue, follow these steps:
Step 1. Add a PHP snippet to your WordPress Site
You can do this either by editing your functions.php file or by using a PHP snippet plugin. The snippet defines a function that reactivates the WooCommerce-specific checkout hooks.
/**
 * Re-invokes certain WooCommerce hooks to activate the AddressZen address verification plugin on checkout.
 * Requires the shortcode "[do_woocommerce_hooks]" to be added to the checkout page.
 */
add_shortcode("do_woocommerce_hooks", function () {
	// Loads JavaScript and CSS assets
	do_action("woocommerce_before_checkout_form");
	// Injects credentials and initializes above assets
	do_action("woocommerce_before_checkout_form");
});
Step 2: Add the Shortcode to Your Custom Checkout Page
On your custom checkout page, include the following shortcode:
[do_woocommerce_hooks]
This will trigger the function you defined in Step 1, enabling the address verification feature. The AddressZen plugin will automatically activate on any standard WooCommerce checkout fields, so no additional setup is required within Elementor itself.
Step 3: Test
Test the address fields in Elementor to ensure the lookup tool works correctly. It should automatically suggest addresses as you type.
Troubleshooting
If you encounter any issues during installation or configuration:
- Make sure you’ve correctly entered your API key.
- Check if the plugin is up to date (you can update plugins via the WordPress admin panel).
- Ensure that your theme or page builder (Elementor, etc.) is compatible with WooCommerce and the AddressZen plugin.
If you need support, you can reach out to us on our support page.